
SortPix XL Photo Organizing Software - Knowledge Base and User Manual
-
1. SortPix XL - Questions and Answers
-
1.1. SortPix XL - General Questions
- 1.1.1. How do I select photos?
- 1.1.2. How to sort photos?
- 1.1.3. How do I rotate photos?
- 1.1.4. How do I rename photos?
- 1.1.5. How to find photos?
- 1.1.6. How do I find duplicate photos?
- 1.1.7. Show the storage space
- 1.1.8. Delete selected elements
1.2. SortPix XL - Error Messages
1.3. SortPix XL - General instructions- 1.3.1. Sort photos video
- 1.3.2. The multiple rename tool
- 1.3.3. Change photo view
- 1.3.4. Create new photo folder
- 1.3.5. Delete existing photo folder
- 1.3.6. Rename SortPix XL folder
- 1.3.7. Delete SortPix XL folder
- 1.3.8. How do I search photos in the target window?
- 1.3.9. How do I find duplicate photos in the target window?
- 1.3.10. Convert destination folder to source folder
- 1.3.11. Display the storage space in the destination folder
1.4. Functions of the toolbar above the right preview window- 1.4.1. Rotate thumbnails
- 1.4.2. Sort thumbnails
- 1.4.3. Change preview view
- 1.4.4. Rename preview photos
- 1.4.5. Rename preview photos multiple times
- 1.4.6. Preview search photos
- 1.4.7. Preview to find duplicate photos
- 1.4.8. Convert the preview folder to source folder
- 1.4.9. View storage space
- 1.4.10. Preview "Start slideshow"
- 1.4.11. Preview "Delete selected elements"
- 1.4.12. Preview "Change order of the images"
1.5. SortPix XL Settings
-
1.1. SortPix XL - General Questions
1. SortPix XL - Questions and Answers
1.1. SortPix XL - General Questions
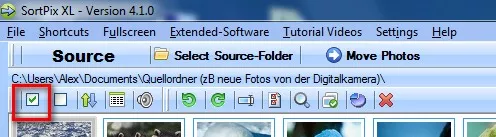
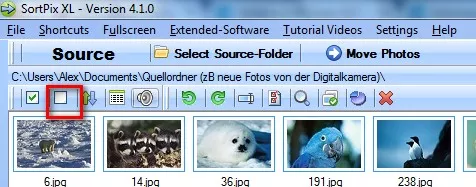
1.1.1. How do I select photos?
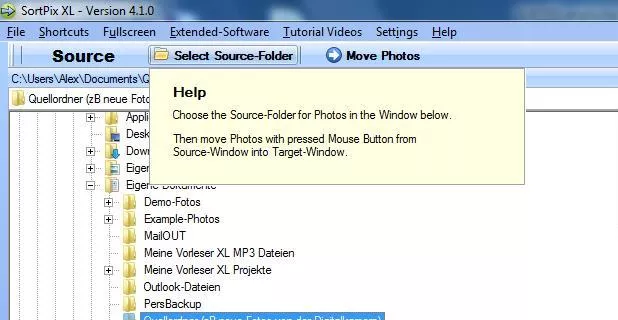
Select a single image:- Start the SortPix XL photo manager software
- Click one of the images in the left window with left mouse button
- The image should now have a mark (different border color)
- Several individual photos can be selected in the left window by holding down the [Ctrl] key while clicking
- All photos of a window can be selected by first selecting one photo by clicking and then selecting the [+] button on the numeric keypad
- All photos of a window can be unmarked by selecting the [-] key on the numeric keypad
- All photos of a window can be selected by first selecting 1 photo by clicking and then selecting the key combination [Ctrl + [+]
Select images from / to:
- Start the SortPix XL photo organizer software for Windows
- Click the first of the images in the left window with the left mouse button
- The image should now have a mark (different border color)
- Hold down the uppercase key (above the [Ctrl] key and click on the last photo to be marked
- The images are highlighted from top left to bottom right
Select all images:
You can select all photos of a window using the toolbar:
Unselect all images:
You can unmark all photos of a window using the toolbar:
Back to menu
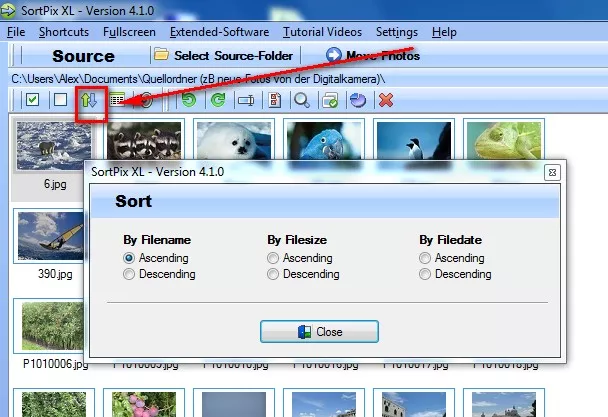
1.1.2. How to sort photos?
Move photos from one folder to another folder- Start the SortPix XL manage photos software
- Define your source folder in the upper left window. The source folder is the folder where the images are NOW - before sorting.
- Define your destination folder in the upper right window. The destination folder is the folder where the images are available AFTER sorting.
- Click one of the images in the left window with left mouse button
- The image should now have a mark (different border color)
- Press and hold left mouse button on the screen
- Now drag the mouse into the lower right preview window
PLEASE NOTE:
If images are dragged from one disk to another, the images are copied by default. If you want to move the images instead copy:
[Shift]-Key + Drag = Force moving
If pictures are dragged from one to the same hard disk, the images are moved by default. If you want to copy instead move:
[Ctrl]-Key + Drag = Force copying - Several individual photos can be selected in the left window by holding down the [Ctrl] key while clicking
- All photos of the left window can be selected by first selecting one photo by clicking and then selecting the key combination [Ctrl] + [+]
- The photos should be only sorted in the destination folder, if all images are in the correct destination folder.
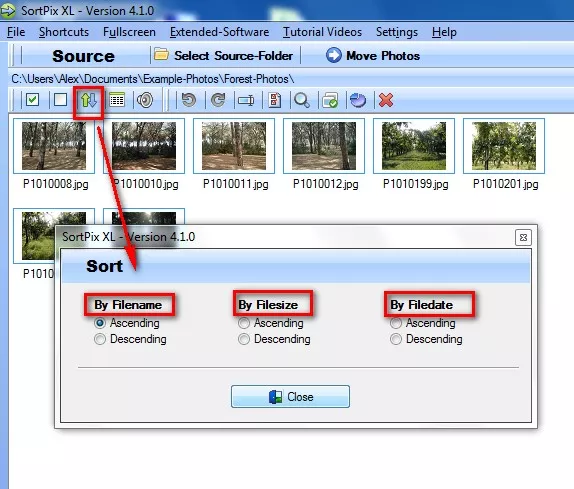
In the toolbar you will also find a feature to set the sort order of the left window before moving it to another folder (in the right window).
The following sort options are available:
- - By file name
- - By file size
- - According to file date
Select source folder:
Click on the destination folder:
Note 1: If your photos are stored on a removable disc (for example memory card of camera or USB memory stick), sorting of photos takes much longer because access to a card is much slower than a hard disc. Sorting is faster when you first copy all photos from the removable media to a new subfolder on your hard drive.
Note 2: Before the sorting of your images, remove the file format ".jpg" from the real-time check of your anti-virus program before, or the folder of the images, if the sorting process is very slow.
Back to menu
1.1.3. How do I rotate photos?
Clockwise rotation - to the right- Start the SortPix XL photo organizing software for Windows
- Define your source folder in the upper left window. The source folder is the folder where the images are NOW - before sorting.
- Define your destination folder in the upper right window. The destination folder is the folder where the images are available AFTER sorting.
- Click one of the images in the left window with left mouse button
- The image should now have a mark (a colored border)
- Several individual photos can be selected in the left window by holding down the [Ctrl] key while clicking
- All photos of the left window can be selected by first selecting one photo by clicking and then selecting the key combination [Ctrl] + [+]
- Press the [R] key on your keyboard: All marked images are rotated 90 ° clockwise
Turn counterclockwise - to the left
- Start the SortPix XL photo managing software
- Define your source folder in the upper left window. The source folder is the folder where the images are NOW - before sorting.
- Define your destination folder in the upper right window. The destination folder is the folder where the images are available AFTER sorting.
- Click one of the images in the left window with left mouse button
- The image should now have a mark (a colored border)
- Several individual photos can be selected in the left window by holding down the [Ctrl] key while clicking
- All photos of the left window can be selected by first selecting one photo by clicking and then selecting the key combination [Ctrl + [+]
- Press the [L] key on your keyboard: All marked images are rotated 90° counter-clockwise
Rotation of selected images
Note: If your photos are stored on a removable disc (memory card of the camera or USB stick), sorting of photos takes much longer, because access to a card is much slower than from a hard disk. Sorting is faster when you first copy all photos from the removable media to a new subfolder on your hard drive.
Back to menu
1.1.4. How do I rename photos?
- Highlight a photo.
- Click the Rename icon
Enter a new filename for the image.
Note: The file is automatically given the suffix ".jpg". SortPix XL is designed for digital camera owners. JPG This is the file format used by most camera models. Other file formats are not supported.
Back to menu
1.1.5. How to find photos?
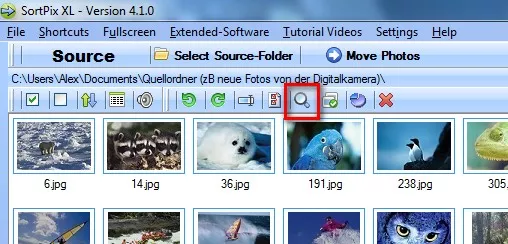
- Start the SortPix XL duplicate photo finder for Windows
- Define your source folder in the upper left window. The source folder is the folder where the images are NOW before the search.
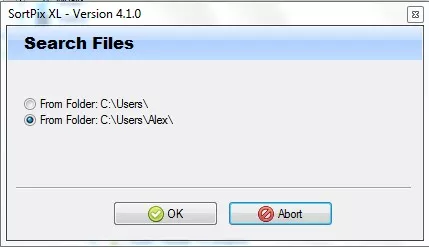
- On the toolbar, click the Search icon.
- A window opens:
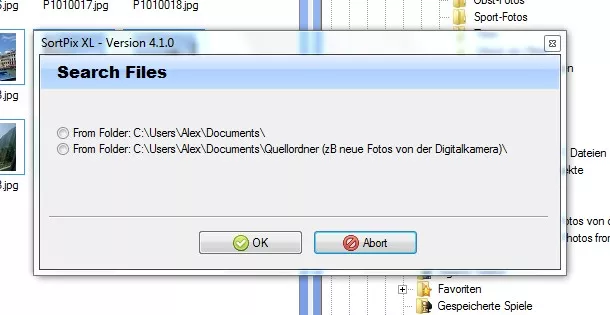
The current source folder plus the superordinate folders are offered for selection. You can change this selection by changing the source folder (step 2).
After selecting and pressing the "OK" button, this window opens:

Explanation of the functions of the photo search Settings:
- Enter your search term here. The display is updated immediately for each character. The search is limited to the filename.
- With the help of the calendar function, you can limit your search time
- The temporal search for the storage date of the photofile can be further limited by selecting one of the three listed time sections
- Here your query is deleted under 1 and the result window is reset (search query reset)
- Switch to Full Screen mode if the preview window is too small for your work. Use the [Esc] button to return to the current view
- Jump to file: Marks the image in the left window
- Copy all found files to a folder of your choice
- Select all found files
- Close = End your photo search query in this folder and switch back to the main functions of the SortPix
Back to menu
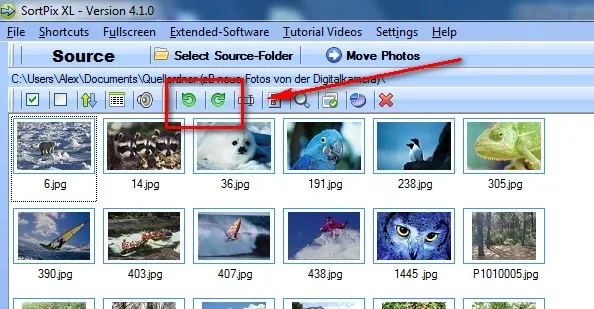
1.1.6. How do I find duplicate photos?
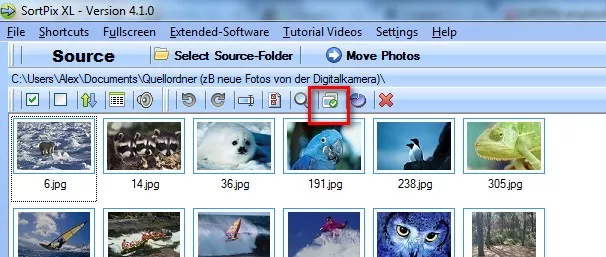
- Start the SortPix XL program to find duplicate photos
- Define your source folder in the upper left window. The source folder is the folder where the images are NOW before the search.
- In the toolbar, click the Search for Duplicate Photos icon
- In the next selection window, you can search for duplicate photos in the current source folder or in the higher order
- Choose which folder to search for duplicate photos
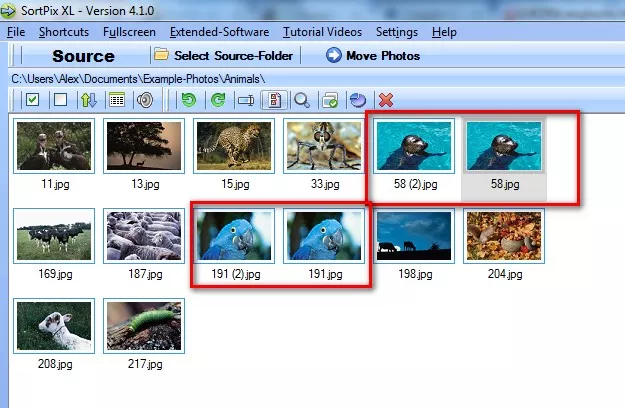
There are 2 double photos in the directory.
Duplicate photos are always marked together.
You must now choose one of the images by marking the images you don't want to keep, then deleting the selected images.
Unfortunately the SortPix can not take this selection, since the photo organizing software for PC does not know which image you want to keep.
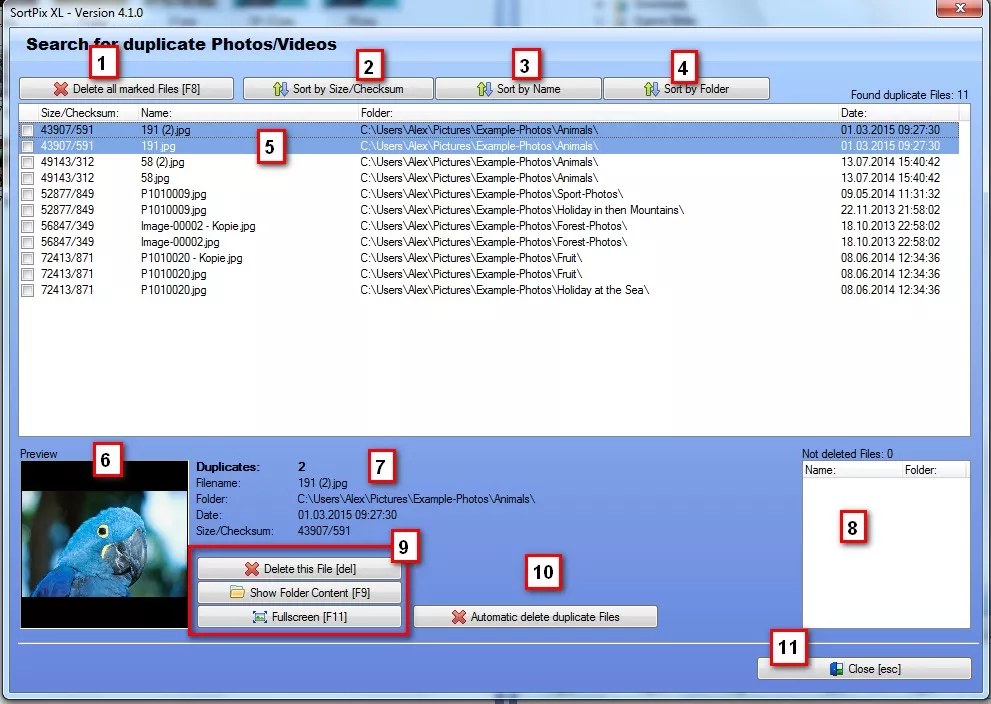
Functional overview of the duplicate check:
- Delete all selected photos
- Sort the images according to your overall size
- Sort photos by name
- Sort the photos in alphabetical order per folder in which they are stored
- Simply click on a photo to see how many duplicates of this image are available on your PC / Double click to start the full view / [Esc] back to normal view. You can also use the up / down arrow buttons to scroll through the image list from one image to the next.
- Preview the selected photo
- Additional information about the photo to facilitate sorting
- Overview, which photos have not been deleted (for example due to write protection / data storage CD or DVD)
- Other features that might be useful in photos sorting: Delete this photo, view folder contents, and display full screen
- Automatic delete duplicate images (Please note the following explanation about this function!!!)
- Close the photo duplicate check
Explanation of the function "Automatic delete duplicate pictures"
Click the button "Automatic delete duplicate pictures"
The following window will open:
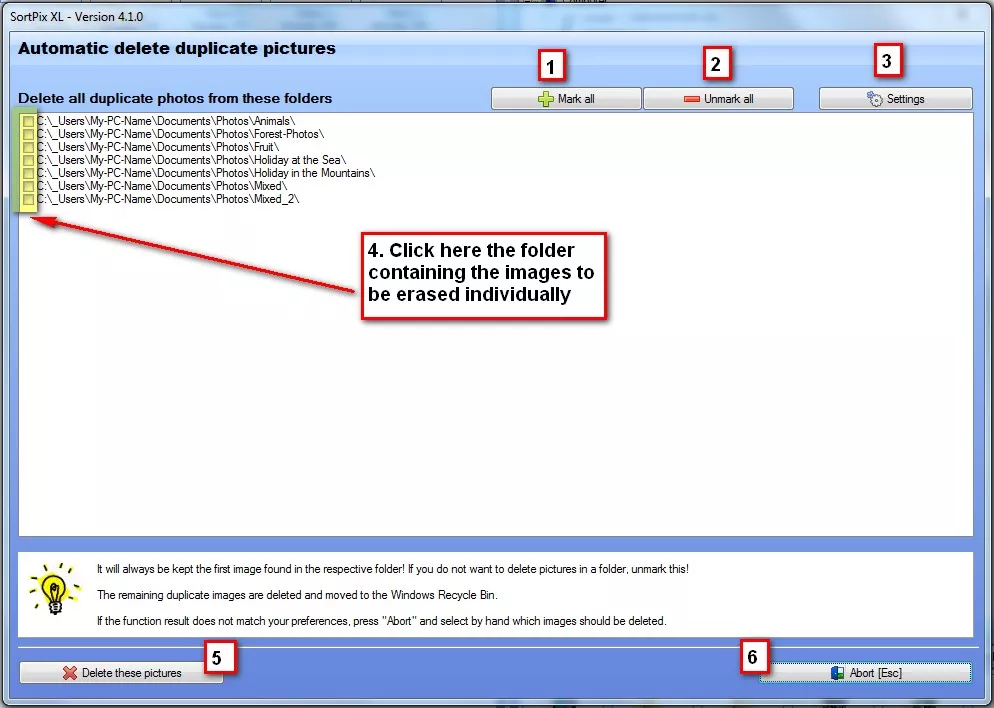
Here you have the following options:
- Select all images for deletion
- Unmark all images
- If necessary, make settings for the file formats to be deleted
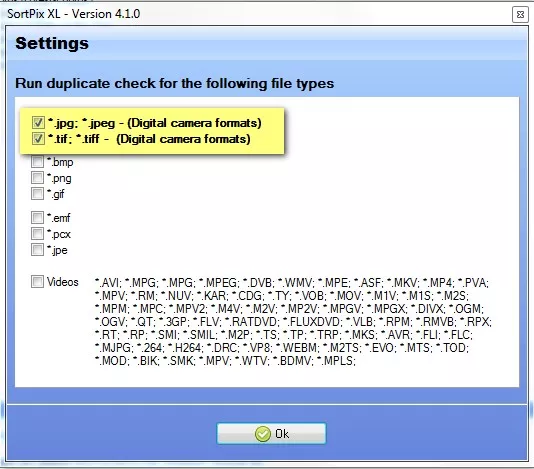
The photo organizer software is preset to the standard file formats of digital cameras (*.jpg / *.jpeg and *.tif / *.tiff)
However, you can also select all other file formats for images and videos. - Click the folder containing the images to be erased individually
- Deletion process is started by clicking on the button "Delete these pictures"
The following safety note appears, which you must confirm at the marked position:
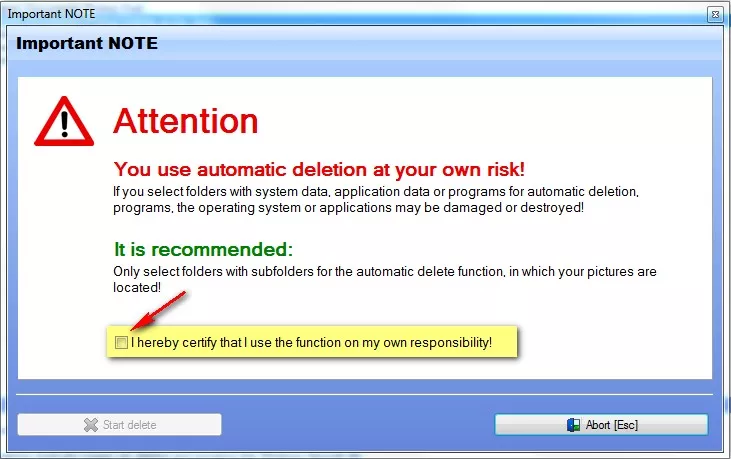
- Cancel the delete process
Back to menu
1.1.7. Show the storage space
You can use the functions to display the used space of a folder.
Back to menu
1.1.8. Delete selected elements
If you select Images in the left Photosorting window, you can delete all the photos at the same time using the "Delete selected elements" function.
Back to menu
1.2 SortPix XL - Error Messages
1.2.1. "Folder or Drive not found"
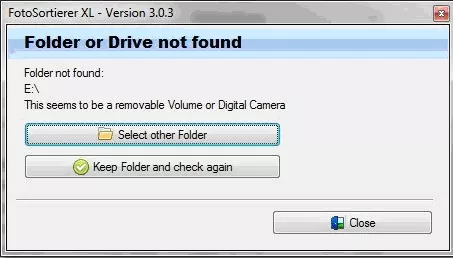
The photo organizing software remembers the source folder of the last session. If this error message is displayed at startup, a removable disk (for example a USB stick or a digital camera, memory card) was connected to the PC from which you have sorted images to the hard disk during the last photos sorting.
This storage medium that contained your images was removed before the new photo managing software start. SortPix shows you this message.
You can either reconnect the storage medium to your PC or select another source folder to resample images by clicking "Select other Folder".
The default picture folder is in your own files or libraries -> Pictures or.
C: \ Users \ Username \ Pictures
Back to menu
1.3. SortPix XL - General instructions
1.3.1. Sort photos video
On our Youtube Channel we currently offer a video clip to our manage photos softwareHere you will find the general guidance video on how to use the software.
Back to menu
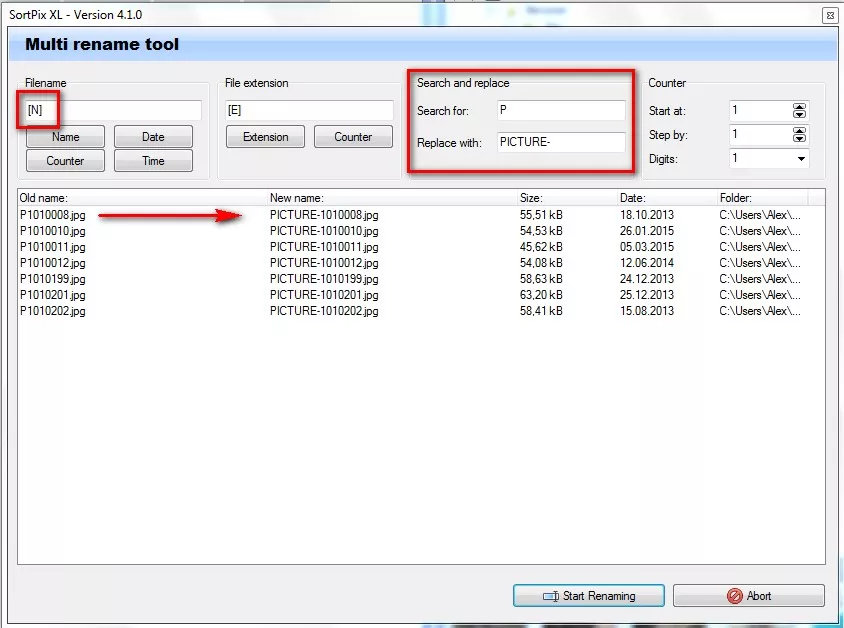
1.3.2. The multiple rename tool
Select the photos (How do I select Photos?), which you want to rename several times.
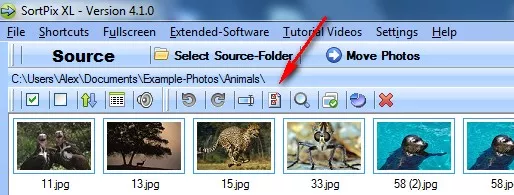
Click the multi-rename tool icon (see the mark on the top figure)
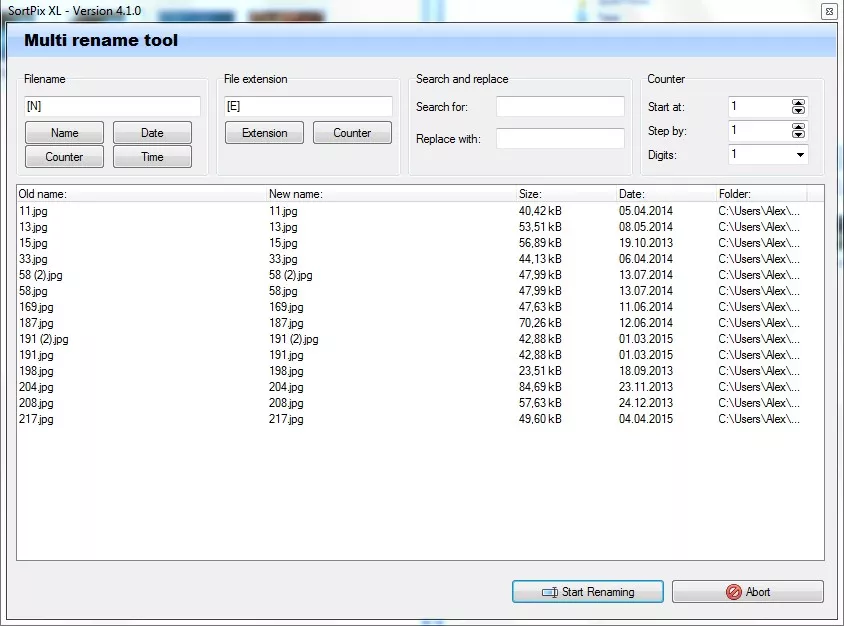
Change file name
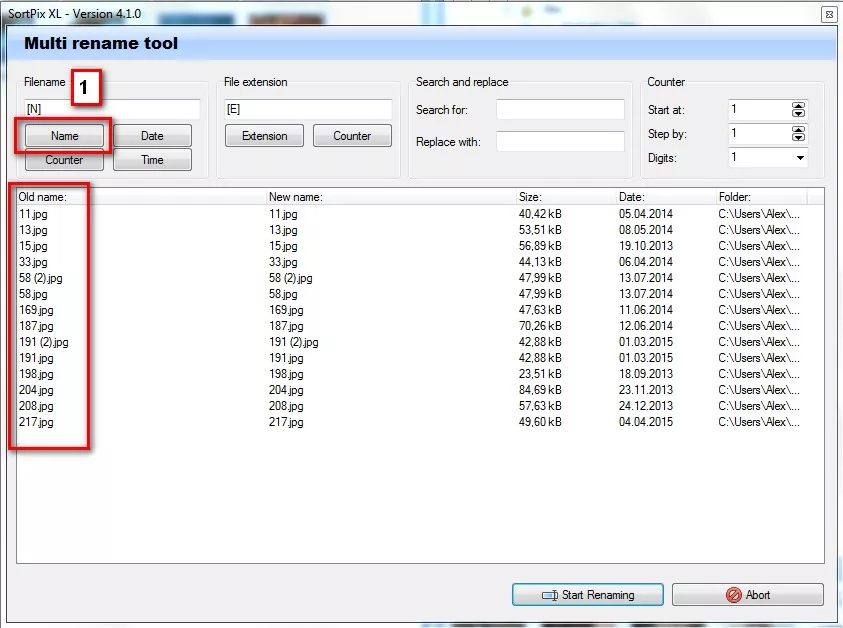
The [N] stands for the file name, which the picture files NOW have before the renaming.
You can keep ALL old filenames as a part, for example if you enter: "Animals-[N]", the result would be:
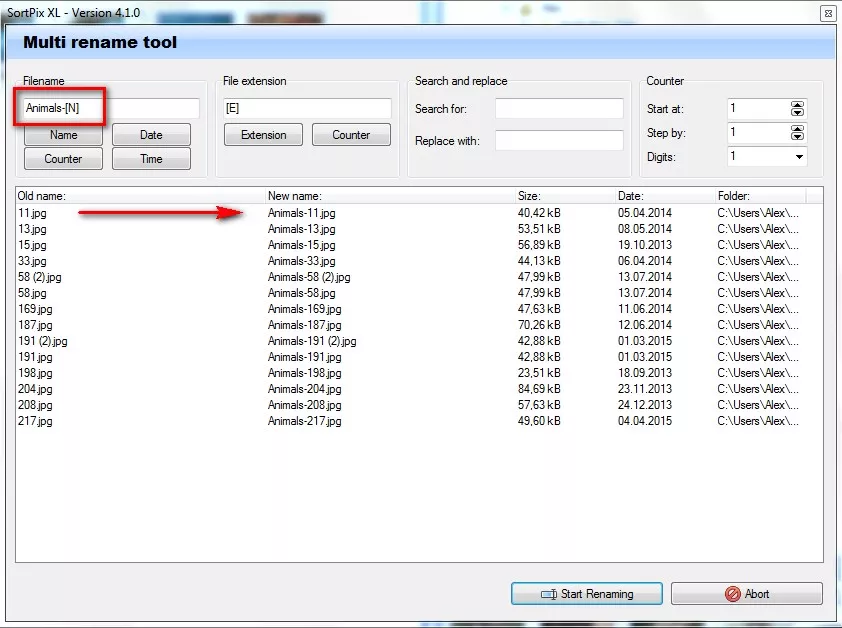
You can also enter a completely new filename, for example, flowers.
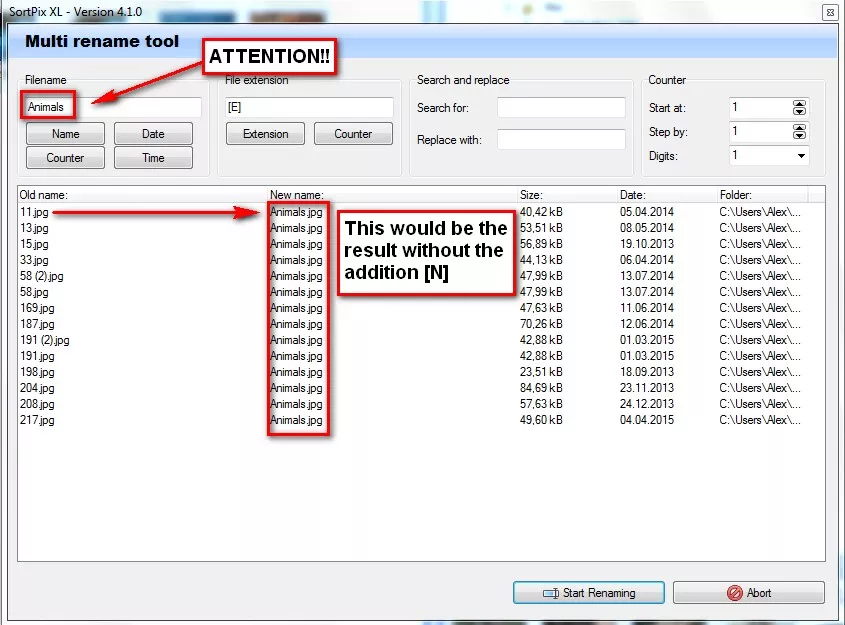
But be careful: If you do not specify a counter, all files would be the same and would overwrite each other. Therefore, only one image is renamed or several, if these files have different extensions. There is NO image lost.
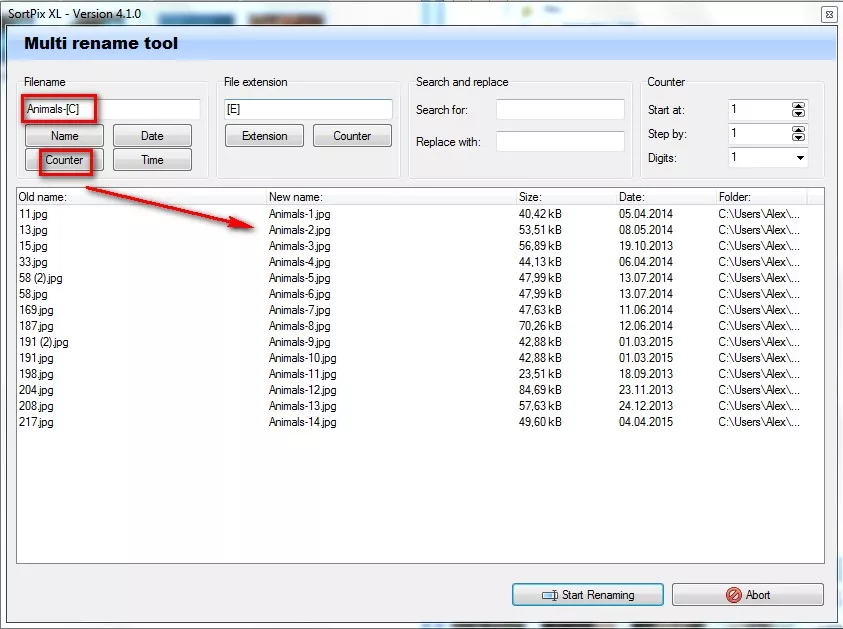
It is recommended to combine the name of the image with a counter:
The [C] stands for counters. The counter can be set at the very right function.
You can specify the starting number, for example with 1, the next picture gets the number 2. You can specify the number of digits. This is useful, for example, if the sorting is to be retained under Windows.
Other combinations are possible with the current date [DATE] or the current time [TIME]
In combinations with the Find and Replace field, individual file names can also be changed (case-sensitive)!
Back to menu
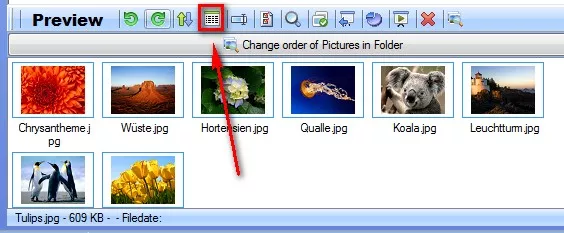
1.3.3. Change photo view
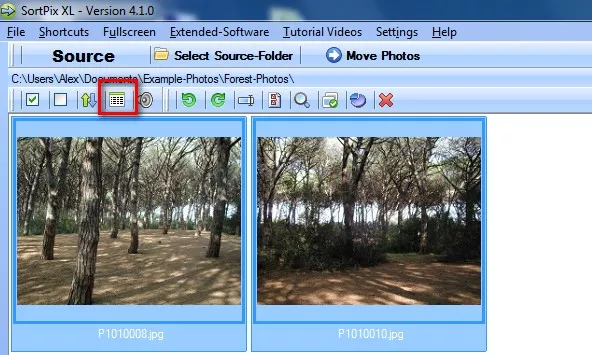
Depending on how many photos are in a folder, it may be useful to change the preview of the photos to make the work easier.
SortPix XL offers you four options (click several times to cycle through):
- Small icons without file name
- Middle sized icons with file name
- Large icons with file name
- View details alphabetically (Use this view if you want to sort your photos by the name or other details.)
Back to menu
1.3.4. Create a new photo folder
- Start SortPix XL
- In the top right target window, select a folder where you want to create the new folder
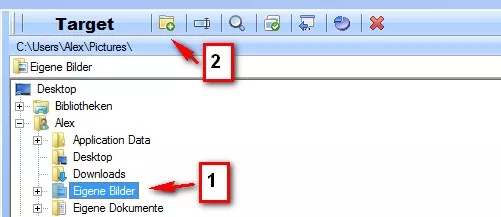
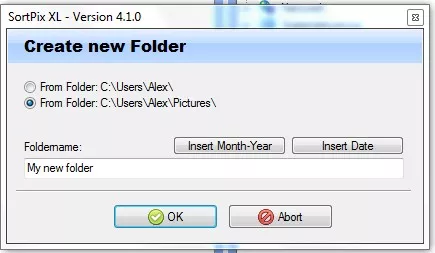
Enter your desired name for the new folder.
Optionally, you can add month and year as well as a date to the folder name.
Press "OK" to confirm your entry and the new folder for your photos will be created
Back to menu
1.3.5. Delete an existing photo folder
- Start the SortPix XL duplicate photo cleaner for Windows
- Select a folder to delete in the upper right-hand side of the window
- Click on the "Delete Folder" function in the upper right toolbar and confirm the deletion of the folder
Back to menu
1.3.6 Rename SortPix XL folder
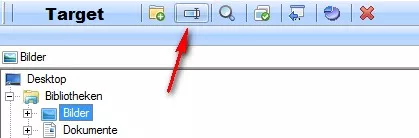
- Start the SortPix XL software to delete duplicate photos
- Select a folder you want to rename in the upper right-hand side of the window
- Click the icon to rename folders
- Enter a new folder name
The same applies to read-only folders and directories, which are located on CDs or DVDs
Back to menu
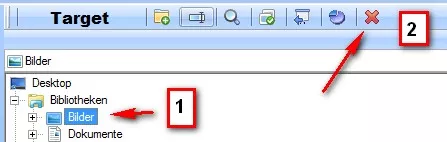
1.3.7 Delete SortPix XL folder
- Start the SortPix XL Windows remove duplicate photos software
- Select a folder you want to delete from the upper right-hand side of the window
- Click the icon to delete folders
- Confirm the deletion of the folder in the next window
- All files in this folder will be deleted!
The same applies to read-only folders and directories, which are located on CDs or DVDs.
Back to menu
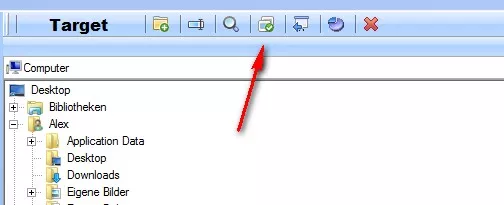
1.3.8. How do I search photos in the target window?
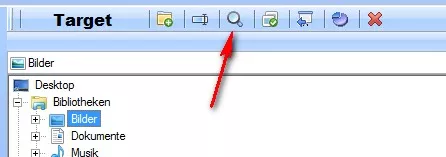
- Start the SortPix XL photo manager software
- In the upper right-hand window, select your folder where you want to search / find your photos
- In the target window toolbar, click the Find icon
- A pop-up window opens:
The current destination folder plus the parent folder is offered for selection.
You can change this selection by changing the source folder (step 2)
After selecting and pressing the "OK" button,
Explanation of the functions of the photo search Settings:
- Enter your search term here. The display is updated immediately for each character. The search is limited to the filename.
- With the help of the calendar function, you can limit your search time
- The temporal search for the storage date of the photofile can be further limited by selecting one of the three listed time sections
- Here your query is deleted under 1 and the result window is reset (search query reset)
- Switch to Full Screen mode if the preview window is too small for your work. Use the [Esc] button to return to the current view
- Jump to file: Marks the image in the left window
- Copy all found files to a folder of your choice
- Select all found files
- Close = End your photo search query in this folder and switch back to the main functions of the SortPix
Back to menu
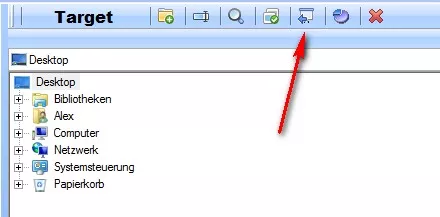
1.3.9. How to find duplicate photos in the target window?
- Start the SortPix XL PC photo organizer software to find duplicate photos
- In the upper right window, select your destination folder where you want to search / find your duplicate photos
- In the next selection window, you can search for duplicate photos in the current destination folder or in the higher order
- Choose which folder to search for duplicate photos
There are 2 double photos in the directory.
Duplicate photos are always marked together.
You must now choose one of the images by marking the images you don't want to keep, then deleting the selected images.
Unfortunately the SortPix can not take this selection, since the software does not know which image you want to keep.
Functional overview of the duplicate check:
- Delete all selected photos
- Sort the images according to your overall size
- Sort photos by name
- Sort the photos in alphabetical order per folder in which they are stored
- Simply click on a photo to see how many duplicates of this image are available on your PC / Double click to start the full view / [Esc] back to normal view. You can also use the up / down arrow buttons to scroll through the image list from one image to the next.
- Preview the selected photo
- Additional information about the photo to facilitate sorting
- Overview, which photos have not been deleted (for example due to write protection / data storage CD or DVD)
- Other features that might be useful in photos sorting: Delete this photo, view folder contents, and display full screen
- Automatically delete duplicate images (Please note the following explanation about this function!!!)
- Close the photo duplicate check
Explanation of the function "Automatic delete duplicate pictures"
Click the button "Automatic delete duplicate pictures"
The following window will open:
Here you have the following options:
- Select all images for deletion
- Unmark all images
- If necessary, make settings for the file formats to be deleted
The photo manager software is preset to the standard file formats of digital cameras (*.jpg / *.jpeg and *.tif / *.tiff)
However, you can also select all other file formats for images and videos. - Click the folder containing the images to be erased individually
- Deletion process is started by clicking on the button "Delete these pictures"
The following safety note appears, which you must confirm at the marked position:
- Cancel the delete process
Back to menu
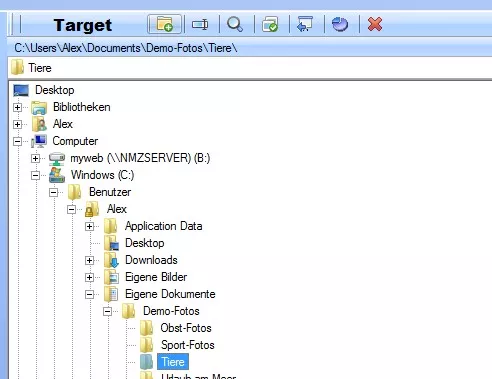
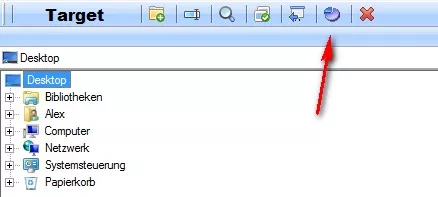
1.3.10. Convert destination folder to source folder
With this function of the photo sorting software, you can make the selected folder in the right window the new source folder in the left window. You just need to confirm the selection. Only the folder is changed, all images remain in the folder in which they were also before.
Back to menu
1.3.11. Display the storage space in the destination folder
The functions allow you to view the used space of a destination folder / target directory.
Back to menu
1.4 Functions of the toolbar above the right preview window
1.4.1. Rotate thumbnails
Clockwise rotation - to the right
- Start the SortPix XL professional photo organizing software
- Define your source folder in the upper left window. The source folder is the folder where the images are NOW - before sorting.
- Define your destination folder in the upper right window. The destination folder is the folder where the images are available AFTER sorting.
- Click one of the images in the right preview window with the left mouse button
- The image should now have a mark (a colored border)
- Several individual photos can be marked in the right lower window by holding down the [Ctrl] key while clicking
- All photos of the right lower window can be selected by first selecting one photo by clicking and then selecting the key combination [Ctrl + [+]
- Press the [R] key on your keyboard: All marked images are rotated 90° clockwise
Turn counterclockwise - to the left
- Start the SortPix XL photo managing software
- Define your source folder in the upper left window. The source folder is the folder where the images are NOW - before sorting.
- Define your destination folder in the upper right window. The destination folder is the folder where the images are available AFTER sorting.
- Click one of the images in the lower right window with the left mouse button
- The image should now have a mark (a colored border)
- Several individual photos can be marked in the right lower window by holding down the [Ctrl] key while clicking
- All photos of the right lower window can be selected by first selecting one photo by clicking and then selecting the key combination [Ctrl + [+]
- Press the [L] key on your keyboard: All marked images are rotated 90 ° counter-clockwise
Note: If your photos are stored on a removable disc (for example memory card of camera or USB stick), sorting of photos takes much longer, because access to a card is much slower than from a hard disk. Sorting is faster when you first copy all photos from the removable media to a new subfolder on your hard drive.
Back to menu
1.4.2. Sort thumbnails

Reorder photos within a window In the toolbar above the preview window, you'll find a feature to set the sort order of the right bottom window.
The same feature can also be found for the left source window.
The following sort options are available:
- - By file name
- - By file size
- - According to file date
PLEASE NOTE:
If images are dragged from one disk to another, the images are copied by default. If you want to move the images instead copy:
[Shift]-Key + Drag = Force moving
If pictures are dragged from one to the same hard disk, the images are moved by default. If you want to copy instead move:
[Ctrl]-Key + Drag = Force copying
Back to menu
1.4.3. Change preview view
Back to menu
1.4.4. Rename preview photos
- Highlight a photo in the lower right window
- Click the Rename icon
- Enter a new filename for the image.
Back to menu
1.4.5. Rename preview photos multiple times
Select the photos (How do I select Photos?), which you want to rename several times.
Click the multi-rename tool icon (see the mark on the top figure)
For more information, see The multiple rename tool
Back to menu
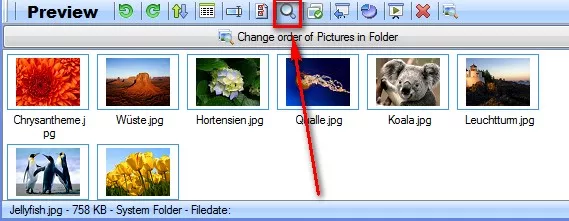
1.4.6. Preview search photos
- Start the SortPix XL photo manager software for Windows 10
- In the upper right-hand window, select your folder where you want to search / find your photos
- Switch to the right, lower window by right-clicking with the mouse
- In the Preview toolbar, click the Find icon
- A pop-up window opens:
The current destination folder plus the parent folders are offered for selection.
After selecting and pressing the "OK" button, this window opens:
Explanation of the functions of the photo search Settings:
- Enter your search term here. The display is updated immediately for each character. The search is limited to the filename.
- With the help of the calendar function, you can limit your search time
- The temporal search for the storage date of the photofile can be further limited by selecting one of the three listed time sections
- Here your query is deleted under 1 and the result window is reset (search query reset)
- Switch to Full Screen mode if the preview window is too small for your work. Use the [Esc] button to return to the current view
- Jump to file: Marks the image in the left window
- Select all found files
- Close = End your photo search query in this folder and switch back to the main functions of the SortPix
Back to menu
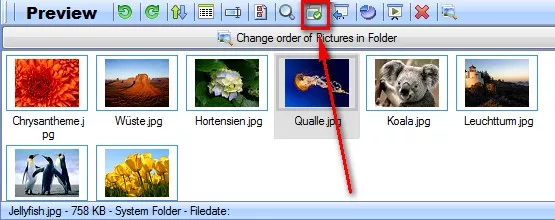
1.4.7. Preview to find duplicate photos
- Start the SortPix XL photo managing software for Windows
- In the upper right window, select your destination folder where you want to search / find your duplicate photos
- Switch to the right, lower window by right-clicking with the mouse
- In the next selection window, you can search for duplicate photos in the current destination folder or in the higher order
- Choose which folder to search for duplicate photos
There are 2 double photos in the directory.
Duplicate photos are always marked together.
You must now choose one of the images by marking the images you don't want to keep, then deleting the selected images.
Unfortunately the SortPix can not take this selection, since the photo organizer software does not know which image you want to keep.
Functional overview of the duplicate check:
- Delete all selected photos
- Sort the images according to your overall size
- Sort photos by name
- Sort the photos in alphabetical order per folder in which they are stored
- Simply click on a photo to see how many duplicates of this image are available on your PC / Double click to start the full view / [Esc] back to normal view. You can also use the up / down arrow buttons to scroll through the image list from one image to the next.
- Preview the selected photo
- Additional information about the photo to facilitate sorting
- Overview, which photos have not been deleted (for example due to write protection / data storage CD or DVD)
- Other features that might be useful in photos sorting: Delete this photo, view folder contents, and display full screen
- Automatically delete duplicate images (Please note the following detailed explanation!!!)
- Close the photo duplicate check
Explanation of the function "Automatic delete duplicate pictures"
Click the button "Automatic delete duplicate pictures"
The following window will open:
Here you have the following options:
- Select all images for deletion
- Unmark all images
- If necessary, make settings for the file formats to be deleted
- Click the folder containing the images to be erased individually
- Deletion process is started by clicking on the button "Delete these pictures"
- Cancel the delete process
The photo organizer software is preset to the standard file formats of digital cameras (*.jpg / *.jpeg and *.tif / *.tiff)
However, you can also select all other file formats for images and videos.
The following safety note appears, which you must confirm at the marked position:
Back to menu
1.4.8. Convert the preview folder to source folder
With this function of the photo sorting software, you can make the selected folder in the right window the new source folder in the left window. You just need to confirm the selection. Only the folder is changed, all images remain in the folder in which they were also before.
Back to menu
1.4.9. View storage space
The functions allow you to view the used space of a destination folder / target directory.
Back to menu
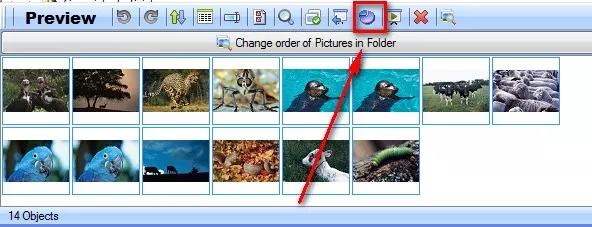
1.4.10. Preview "Start slideshow"
You can play the images from your selected destination folder as a full-screen slideshow with background music. To do this, press the "Start Slideshow"
A selection window opens:
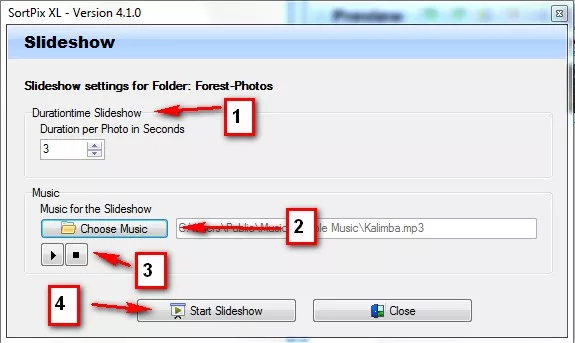
- Determine the duration of the photos
- Select a music file from your hard drive
- With the Player Sybmol you can listen to the piece of music. The stop button terminates the playback of the audio file.
- Start the slideshow here in full screen mode, you can end the slideshow by pressing the [Esc] button
- Close the slide show dialog box
Back to menu
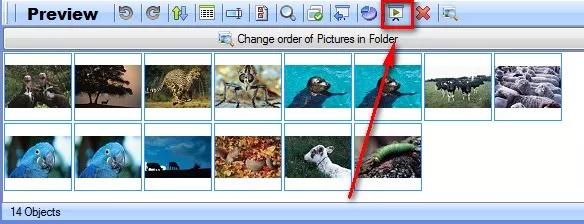
1.4.11. Preview "Delete selected elements"
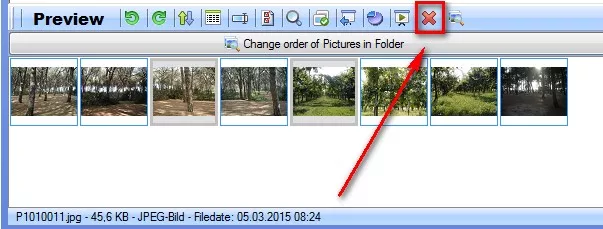
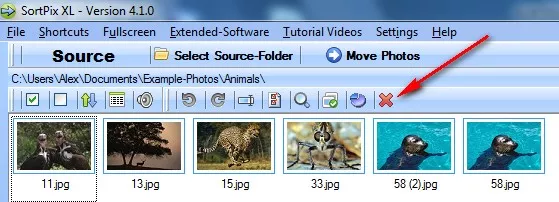
Mark the picture you want to delete by clicking on it, then click on the red "X" symbol.
Back to menu
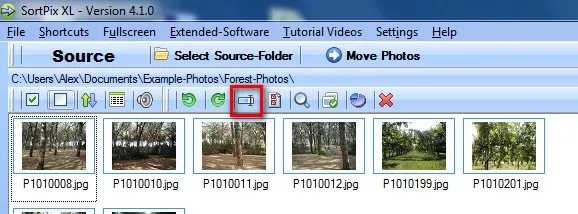
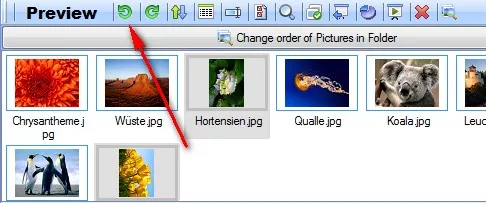
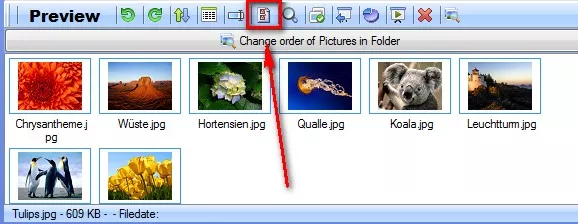
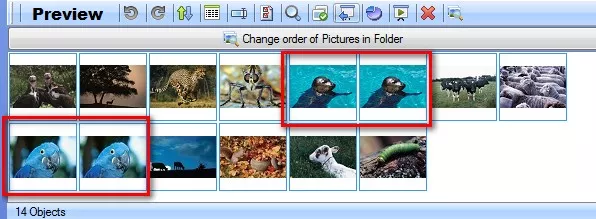
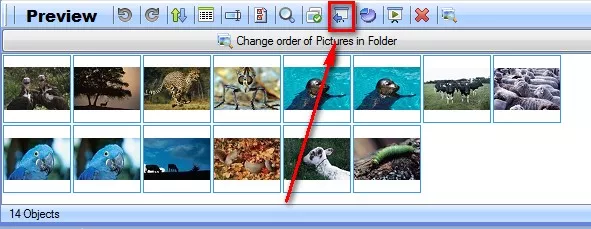
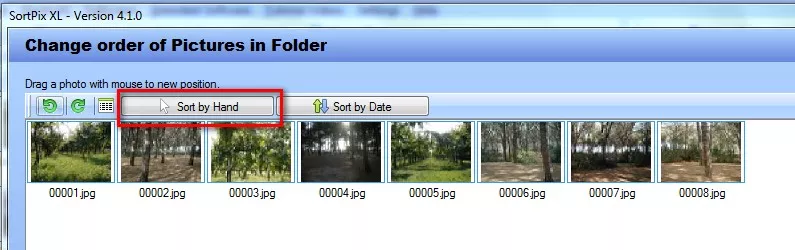
1.4.12. Preview "Change order of the images"
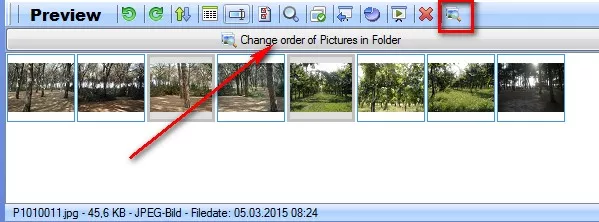
The ultimate function of the software is to drag the images within a folder into the desired order and to rename them accordingly, so that this sorting is also retained on the Windows system.
- Start the SortPix XL photo manager software
- Define your source folder in the upper left window. The source folder is the folder where the images are NOW - before sorting.
- Define your destination folder in the upper right window. The destination folder is the folder where the images are available AFTER sorting.
- In the upper right window, select the folder whose photos you want to reorder
- Start the Change image order order function
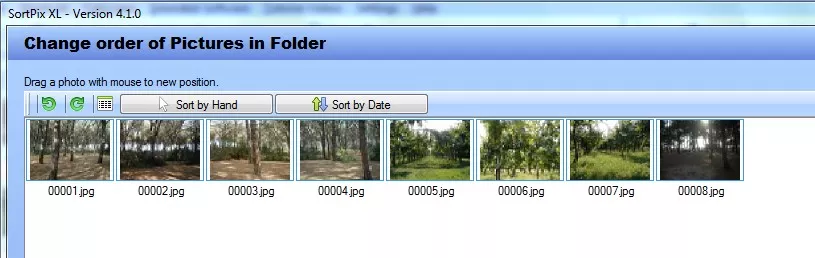
The selected folder opens in a new window in full screen mode.
There are three helpers in the toolbar:
- Rotate image to the left
- Rotate image to the right
- Change View
- Now click on a photo with the left mouse button
- Hold down the left mouse button
- Drag the photo to another photo to be taken
- Release the mouse button
- Repeat the process until the desired sequence is displayed
- Click "OK"
Tip: To change the last image within a folder, which is unfortunately also somewhat cumbersome to handle: You can exchange the last image in a folder by dragging the desired image to the last position. You can not click and move the last image. The position must be changed differently
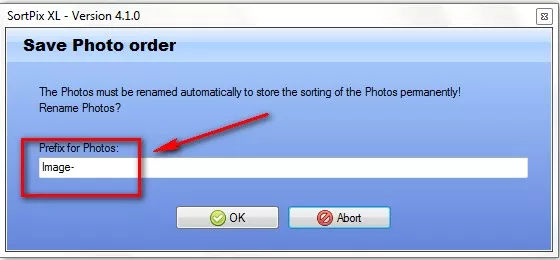
A new window opens:
You must now enter a file prefix. The file prefix is the beginning of the name of the photos' name. It is supplemented by a continuous numbering (incremental). Only then can the sort order of the photos be retained for all other applications. The previous file is lost.
If you subsequently rename the images or use the multiple rename tool, the sorting on a computer can be displayed differently, since the alphabetical sorting of file names has its own logic!
Back to menu
1.5. SortPix XL Settings
1.5.1. SortPix XL Settings
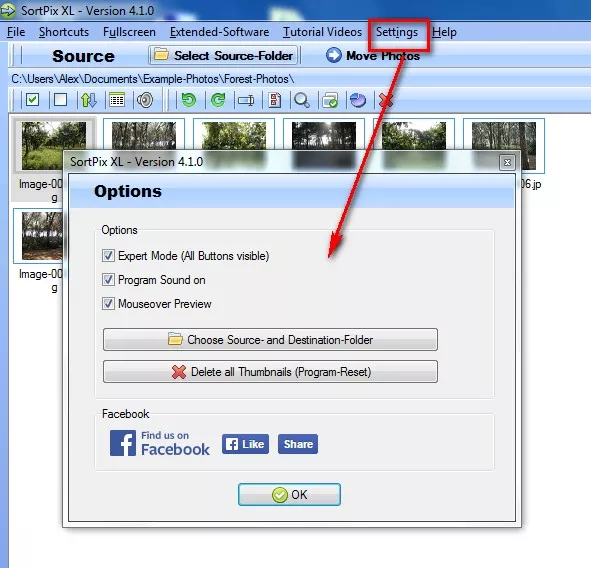
Program sound
You can turn the sound on and off in the left-hand toolbar.
Mouseover Preview (Show image when mouse pointer over)
Here you can activate the image preview.
Source and destination folder selection
Define your source folder. The source folder is the folder where the images are NOW - before sorting.
Define your destination folder. The destination folder is the folder where the images are available AFTER sorting.
Clear all thumbnails
Your images are created as thumbnails for the preview. These files are deleted. Your pictures will NOT be deleted.
Back to menu
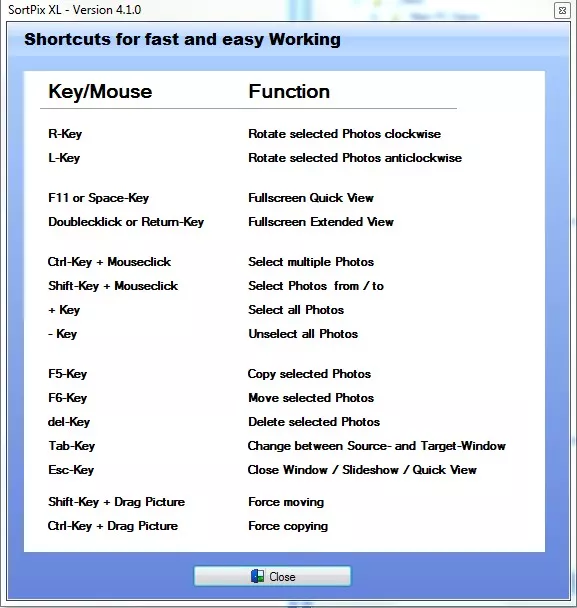
1.5.2. Keyboard commands
(Overview of key combinations for image sorting.)You do not have to drag the photos from one folder to another. The software can also be operated with key combinations.
Click on "Shortcuts" (menu above), then "Shortcuts for faster working" to see all the available keyboard commands.
Back to menu